
The Meta Pixel (also called Facebook Pixel) is a JavaScript snippet that tracks what visitors do on your site and sends that data to Facebook. Once installed, you can measure ad performance, build retargeting audiences from past visitors, and let Facebook optimize your campaigns toward real conversions.
Pick your framework below for a step-by-step guide. Most installs take under 5 minutes.
Getting Your Pixel ID
Before installing, grab your Pixel ID from Facebook:
- Go to Facebook Events Manager
- Click Data Sources → select your pixel (or create one)
- Copy the Pixel ID (15-16 digit number)
![]()
JavaScript Installation
For any JavaScript project, I recommend using the Meta Pixel NPM package:
npm install @adkit.so/meta-pixel
Then initialize the pixel:
import META from '@adkit.so/meta-pixel';

META.init({
    pixelIds: ['YOUR_PIXEL_ID'],
    autoTrackPageView: true,
    debug: true, // Remove in production
});
Tracking Events
import META from '@adkit.so/meta-pixel';

// Standard events
META.track('ViewContent', { content_id: 'product-123' });
META.track('AddToCart', { value: 29.99, currency: 'USD' });
META.track('Purchase', { value: 99, currency: 'USD' });

// Custom events
META.trackCustom('WatchedVideo', { video_id: 'abc' });
You can verify events are firing with the Meta Pixel Helper Chrome extension:
Available Standard Events
PageViewViewContentAddToCartAddToWishlistInitiateCheckoutPurchaseLeadCompleteRegistrationSubscribeStartTrialSearchContactDonateSchedule
Use standard events whenever possible. They work better for ad optimization than custom events.
What Events to Track in Your SaaS
For a typical SaaS funnel, track these events:
| Event | When to Trigger |
|---|---|
ViewContent | On page load of blogs, pricing or features page |
Lead | On form submit (newsletter, lead magnet, waitlist) |
CompleteRegistration | After successful account creation |
StartTrial | When user activates free trial |
Subscribe / Purchase | On subscription success page (use eventID for deduplication) |
Focus on conversion events (Lead, StartTrial, Subscribe). These are what you'll optimize your ads for. Use the conversion rate calculator to set a baseline before your campaign starts.
Manual <script> Installation
If you can't use npm, add this script directly to your HTML <head>:
<!-- Meta Pixel Code -->
<script>
    !function(f,b,e,v,n,t,s)
    {if(f.fbq)return;n=f.fbq=function(){n.callMethod?
    n.callMethod.apply(n,arguments):n.queue.push(arguments)};
    if(!f._fbq)f._fbq=n;n.push=n;n.loaded=!0;n.version='2.0';
    n.queue=[];t=b.createElement(e);t.async=!0;
    t.src=v;s=b.getElementsByTagName(e)[0];
    s.parentNode.insertBefore(t,s)}(window, document,'script',
    'https://connect.facebook.net/en_US/fbevents.js');
    fbq('init', 'YOUR_PIXEL_ID');
    fbq('track', 'PageView');
</script>
<noscript><img height="1" width="1" style="display:none" src="https://www.facebook.com/tr?id=998515319079495&ev=PageView&noscript=1" /></noscript>
<!-- End Meta Pixel Code -->
Replace YOUR_PIXEL_ID with your actual Pixel ID.
fbq('track', 'PageView') on route changes.
That's why I recommend using the JavaScript NPM package package if possible.Verify Your Installation
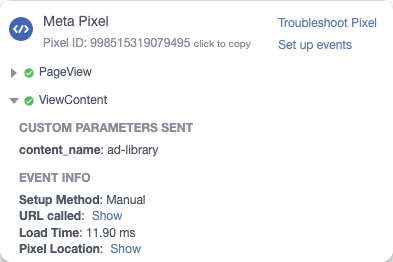
Use the Meta Pixel Helper Chrome extension to verify your pixel is firing correctly. It shows a green badge when pixels are detected on the page.
![]()
Next Steps
Once your pixel is installed:
- Create audiences in Events Manager based on visitor behavior
- Set up conversions to track purchases, signups, or other goals
- Run optimized ads using your pixel events as optimization targets
Related Resources
- What is Retargeting? — how Facebook uses your pixel data to show ads to past visitors
- Conversion Rate Guide — understand what you're optimizing for before you spend
- ROAS Calculator — figure out what return you need to make your ads profitable
- When to Run Ads for SaaS — pixel data is only useful if you run the right campaigns at the right time
- How Ads Platforms Work — understand the auction model Meta uses to serve your ads
Frequently asked questions
Get your Pixel ID from Facebook Events Manager, then add the pixel code to your site. For React, Next.js, or Nuxt, use the @adkit.so/meta-pixel npm package. For plain HTML, paste the base code into your tag. The full steps depend on your framework -- use the guides above for copy-paste instructions.
The Meta Pixel (formerly Facebook Pixel) is a piece of JavaScript code that tracks visitor actions on your website. It sends this data to Facebook so you can measure ad effectiveness, build targeted audiences, and optimize your campaigns.
Yes, the Meta Pixel is completely free to use. You only pay when you run ads on Facebook or Instagram that use the pixel data for targeting or optimization.
Yes! Install the pixel as early as possible, even if you don't plan to run ads for months. The pixel collects visitor data immediately, so when you're ready to launch campaigns, you'll have a warm audience to target instead of starting from zero.
They're the same thing. Facebook rebranded the Pixel to "Dataset" in some interfaces, but functionally they work identically. You may see both terms used interchangeably in Facebook Business Manager.
